Planning a ceramics studio conversion needs some careful thought. A two-car garage under a suburban home has to be converted into a small pottery teaching studio that could house 6 – 10 students. It would also be used as a private studio two days a week.
The garage floor-space is relatively small for this requirement as it is only 5.8 metres by 5.4 metres – 31 square metres or 350 square feet in area. But the area under the home has some unusual aspects, which we hope the design will be able to leverage. The home is built into a steep hill, so some of the areas under the house are inaccessible.
In an area so small, it is essential to understand what has to be accommodated. In planning your own studio, it is useful to write down all of the requirements and to form an idea of the kind area each will need. In this case, the studio required:
- Three to five wheels for throwing
- A mid-sized electric kiln and a small top loader
- Tables for wedging, hand-building, decorating and packing
- Clay storage for new and recycled clay and a place for a pug mill
- A separate area for glaze preparation and application
- Lots of shelf space for storing the clay masterpieces at various stages
- Easy cleaning of the work areas
- A space for administrative work
- A welcoming, artistic atmosphere
In a commercial pottery studio, throughput and efficiency are primary concerns. In a teaching studio, though, aesthetic factors are important to make the students feel at home. Safety would be essential as beginners often underestimate potential risks associated with the various stages in pottery production.
With so many students, medium-term storage is always at a premium; and cleaning up after a lesson has to be quick and easy. We also have to accommodate wheel work, hand-building, glazing and general decoration, so clear work areas were essential along with lots of tables and chairs.
Areas of significant hazard would ideally be in different zones, so the kiln and the glaze preparation areas needed to be separate.
GOING WITH THE FLOW
The flow of materials in a studio is the first place to start with any design. You have to unload heavy bags of clay so the clay storage area should be as close to the delivery door as possible. This way, you minimise effort, and the bags of clay don’t have to be carried through the work areas.
At the other end, finished work needs to be packed and loaded into bulky cartons, so ideally, dispatch should be near to a door as well. With the beginnings and ends defined, what about all the processes in-between?
In a linear studio, raw materials like clay, glazes and other materials are delivered at one end, and the finished works are collected at the other, with all the production stages laid out logically between the two.
In our case with a square space, the more usual u-shaped studio design will apply. So, clay comes in the delivery door, and the work processes meander through the workspace, and the finished goods come out near to that same delivery door. The trick is to make sure work processes can be completed without a lot of needless walking or crisscrossing.
CREATING ZONES OF WORK
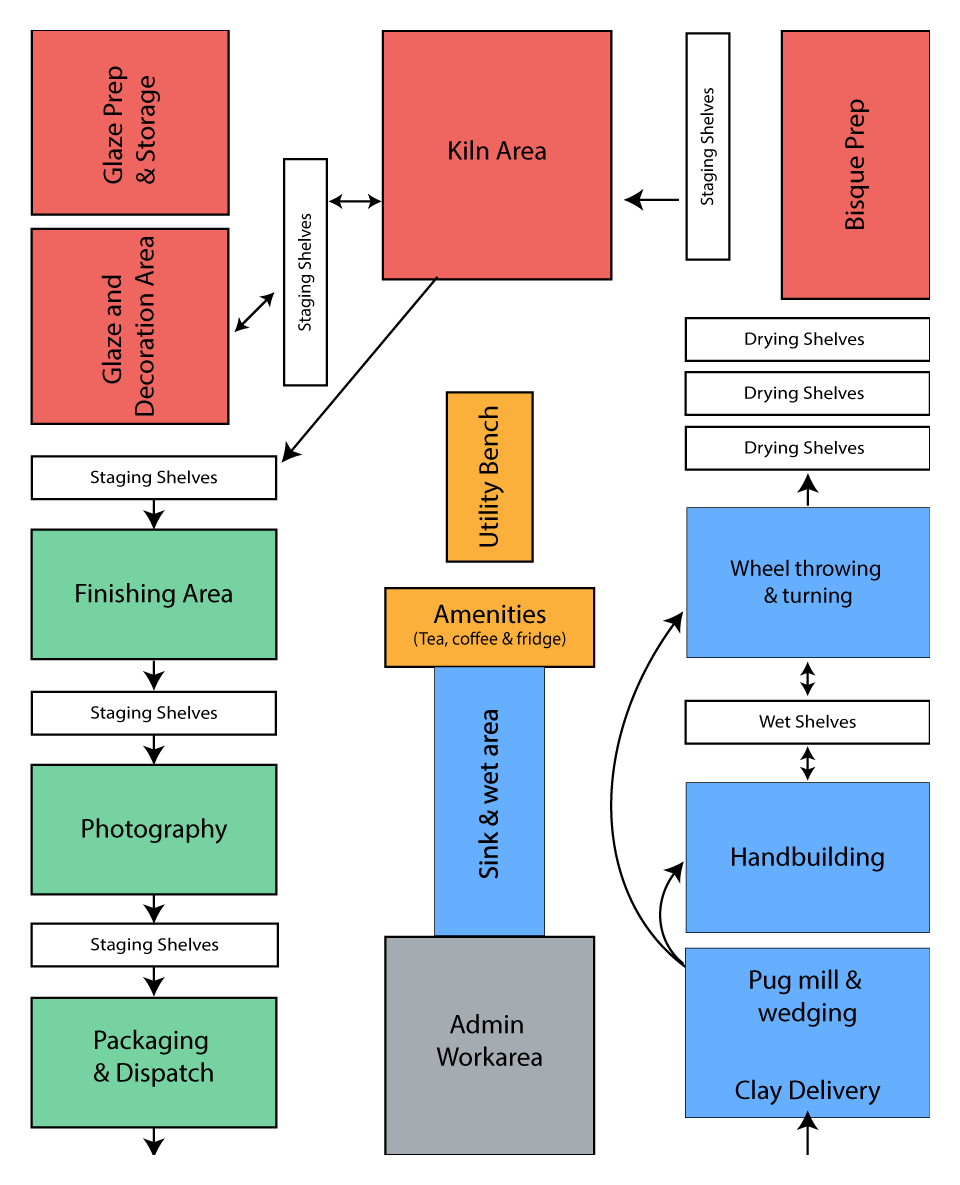
In the attached diagram, there is an idealised workflow for a typical studio.
Space is broken down into zones that can have their own tools, shelving or special requirements like the lighting, bench space and ventilation.
In our case, the zones might work like this:
- Clay is delivered and stored
- It is pugged or wedged ready for use
- It goes to hand-builders or to the throwing wheels
- Pieces go into a wet-storage area to harden
- Pieces are turned or finished before going to drying shelves
- A bench for preparing pieces for the bisque firing and transfer to the kiln
- Bisque Firing
- Glazing and decoration
- Glaze firing
- Further glazing if required (and third or fourth firing if needed)
- Post kiln clean up of the finished works
- Photography for marketing and publicity
- Inventory, packaging & dispatch
You can see from the work-flow diagram, there is a lot of shelving used to separate the various zones. For example, there is specially designed “wet” shelves near the wheel and hand-building areas, to help control the speed at which the work goes to leather hard. Then between each process, there are dedicated staging shelves.
So for example, the output of the bisque preparation area is a set of staging shelves that form the input supply for the kiln area. This minimises walking and transporting vessels, reducing breakages and damage and saving time and effort.
UNIQUE ASPECTS OF THE GARAGE SPACE
The garage under the house has several exciting features that became evident when the floor-space was measured up.
Attached is the rough thumb-sketch with the measurements showing three exciting spaces that would turn the floor area into a handy studio space. There was a small nook near the front door where a wood-work bench now sits. This space could accommodate the kilns.
Luckily it also had a cast concrete ceiling, so there were no fire hazards if the kilns were housed there. It could also be easily vented to the outside for the kiln gas extractor. It could also be walled off from the main space if that became necessary.
A storage space next to the garage floor was defined by house support columns and had a concrete floor. It could make an ideal glaze mixing zone. Also, the house plumbing was accessible from the back of this space.
Finally, there was a long corridor of accessible space running in-line with the front of the house, tall enough to be converted into storage shelves for the student’s work. It would need some work, but it was possible.
CREATING A FLOOR PLAN
The measurements from the rough diary page thumb-nail drawing of the space now needed to be turned into something usable. Initially, these were transferred onto graph paper torn from an old school book (also available from any supermarket or newsagency). The small grids made it easy to get the proportions accurate, but it was time-consuming doing draft after draft as mistakes were made.
There are free online tools for creating two-dimensional and three-dimensional plans – the best known is probably SketchUp. Previously owned by Google, it has been spun-off into a separate business. But the application is free, and there are plenty of online tutorials on how to use it, so it was worth a try for this project. (Get your free SketchUp account at https://www.sketchup.com/products/sketchup-for-web).
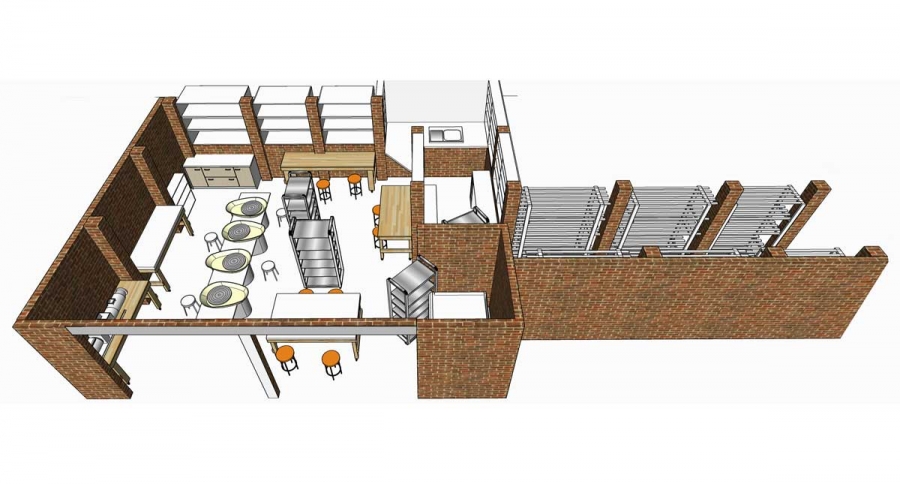
After a bit of work, the dimensions on the thumb-nail sketch were transformed into a 2D SketchUp plan. The initial output from SketchUp is shown, and the potential of this particular studio is becoming clear. With a bit more work, the tools within SketchUp can be used to create 3D representations of the space and to look at the studio from a variety of perspectives to make sure the layout would work as intended.
This would be particularly useful if we could place models of the wheels, benches, kilns, shelves and pug-mills into the overall model of the studio.The layout could be tested to see if three or five wheels would fit, the kilns could be placed in the nook, the shelves would be accessible, and people had room to move.
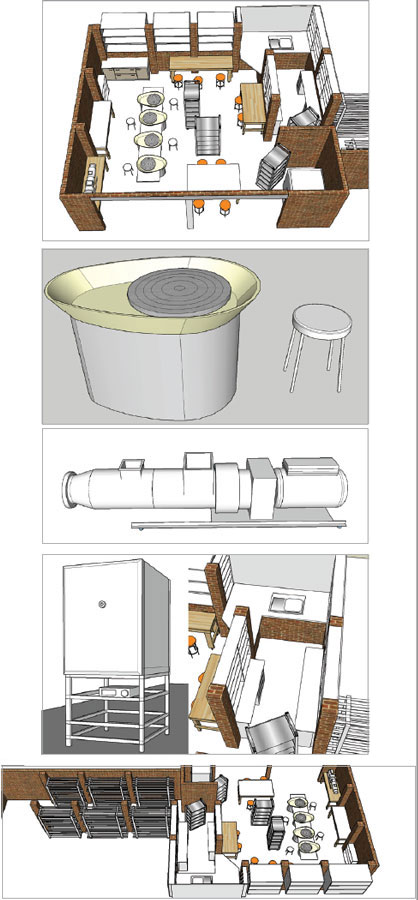
One of the reasons SketchUp is so popular is that it has a “warehouse” of 3D models you can download and drop into your model. The warehouse already had some kilns, tables, cupboards, shelves and even some 3D models of pottery wheels. These were downloaded and placed into the model.
To get the measurements correct, we had to create our own models of critical components. These have been uploaded to the SketchUp warehouse and are available for anyone to use for free. We have done the same with other major pieces of our model – just search the warehouse for “CAQ”, and all the models should appear for you to download.
Now we have the models, we can position them within the studio to see what works. It became clear that only four pottery wheels would fit into the area, and even that was pushing the envelope.
The staging shelves between each of the zones were taking up too much room in the main studio. As the majority of the shelving was to be down the drying corridor, we opted to create four mobile shelving units to allow for flexibility in the main studio space.
In the glazing area, the narrow space meant the shelves and cupboards could only be 500 mm wide. Space was left under these for barrels of mixed glaze and drawer units that will be constructed to hold bulk glazing materials. Oxides, stains and other valuable materials will be stored in shelves on the far wall. A sink unit is to be installed in the back of the glazing area, with a three-stage settling tank unit is to be built underneath the sink for easier maintenance and servicing.
Although there are several power points already installed, the studio space will require three separate fused power lines for the kilns, wheels and the pug mill. Additional overhead lighting is needed for all areas.
The studio is protected from all but the worst easterly weather, so most of the time the garage doors can be left open to provide light and ventilation. There is currently no provision for dust-extraction, a fume cupboard or a spray booth because of space limitations. However, there is a concrete apron in front of the studio that may be pressed into service for dusty or smelly tasks.
Dispatch and photography are on one of the work tables when needed. These activities are of less importance in a teaching studio compared to a production studio.
So while we understood what an ideal studio should look like, perfection had to tempered with practicality in this design. However, in the end, a satisfactory studio concept has emerged from the process.
Workshop workflow concept showing the main activity zones. Clay enters at the bottom right, passes through the wet production zones, into the glaze & firing zone at the top and finally back down to the finishing zone.
The emerging design of the studio Left to right: A rough with the basic measurements of the space, a 2-D plan made in SketchUp, the walls and piers were extruded to give a 3-D view and the final main space.
Three Dimensional Models Top to Bottom: Venco wheel , Pug Mill, Woodrow Kiln, view of the glazing room, overall view of the studio. All were made in SketchUp


